Whether it is heavy snow, air, or dirt you are trying to avoid and looking for ways to make your DIY goggles from objects you can find at home, then you have come to the right spot.
We know that buying hundreds of dollars worth of Snow & MX goggles is not worth it if you are just gonna use them for a few hours or days. In this blog, we will give you a step-by-step guide to make 3-types of Goggles, which are;
- How to make Homemade Basic Snow Goggles?
- How to make DIY Advanced Snow Goggles?
- How to make Homemade Advanced Motor Bike Goggles?
1) How to make Homemade Basic Snow Goggles?
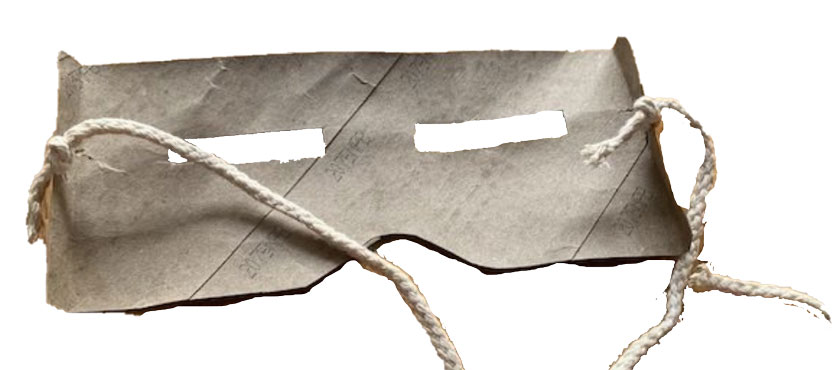
The oldest design of Snow Goggles is called “ilgaak” or “iggaak”. These goggles are very simplest in design, took less than 5 mins to make, and were made by Inuit Peoples over 4000 years ago.
Figure 1.0 ilgaak Goggles 4000 years Old Design
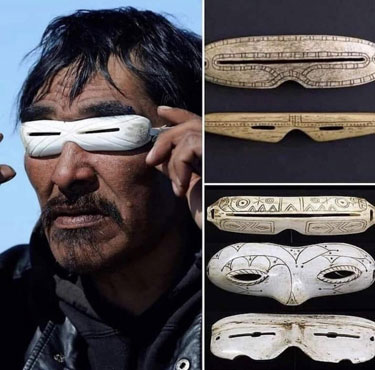
In the old days, there were made with bone, caribou antlers, walrus ivory, driftwood, or seashore grass ( sometimes ).
3-Easy Step Guide
In the modem world, you can make them easily with simple steps as below;
- Step no 1) Collect Materials
- Step no 2) Cut out the Parts
- Step no 3) Attach Strap
Step no 1) Collect Materials
In today’s world, you don’t need bones to make them. You can make them easily with the below materials;
- Felt / Cardboard / Bark or Pliable Piece of Wood
- String / Elastic Strap ( 18 inches )
- A Sharp Scissors / Knife
Step no 2) Cut out the Parts
- Cut the Goggles into desired Size: You can make them very small to cover your eyes just like traditional “ilgaak goggles”, or make them big ( approx 5 inches length x 7 inches height) to protect your head & most of your face.
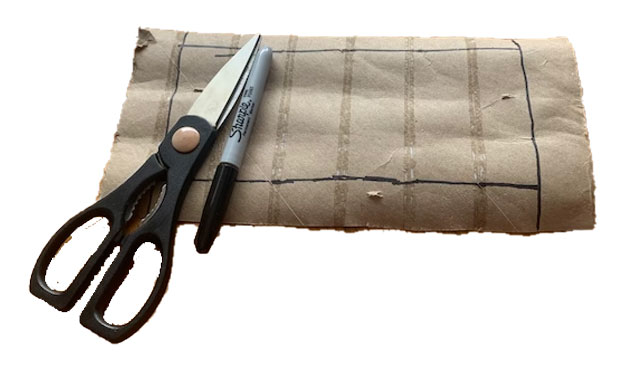
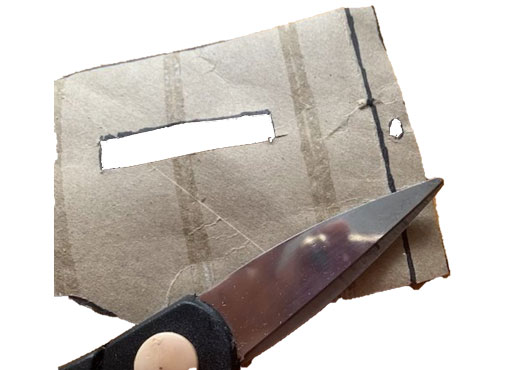
- Cut the Eyes & Nose Parts: Now calculate the distance between your eyes and cut out the eye holes in the frame material using a knife or scissors but make sure there are no more than ⅛” an inch wide ( 0.317 cm ); otherwise, snow may get in. Then, cut out the nose part in a rectangular form, but make the top a little rounded.

- Make 2-Holes for the Strap: Use a knife or scissor edge to pinch two holes at the side of your frame just beside the eye parts.
Step no 3) Attach Strap
- Lastly, get an 18” cord and strap, and cut it into 2 equal parts. Then, pass both parts through the holes we made earlier and tightly knot them.
That’s it; your goggles are completely done. Just put them on and tie the knot of strap or cord at the back of your head.
2) How to make DIY Advanced Snow Goggles?
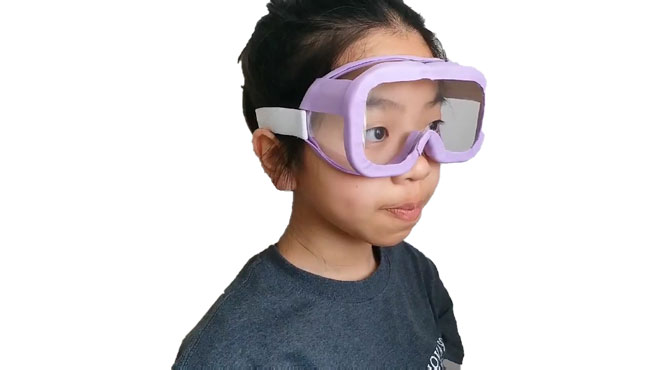
If you don’t like the old thin design of “ilgaak goggles” and want to make something super cool just like the new Jetpilot goggles in the market, then you can try out the below ones.
3-Easy Step Guide
- Step no 1) Collect Materials
- Step no 2) Cut out the frame & Mold it
- Step no 3) Assemble the Parts
Step no 1) Collect Materials
These Goggles may look high-tech and hard to make, but you won’t believe me if I say you can make them with these home materials;
- A 2.25-litre big Clear Plastic Bottle ( Pepsi, CocaCola, etc. )
- Scissors
- Paper Tape
- Paper & Pencil
- Foaming Sheet
- Elastic Strap /Cord
Step no 2) Cut out the Frame & Mold it
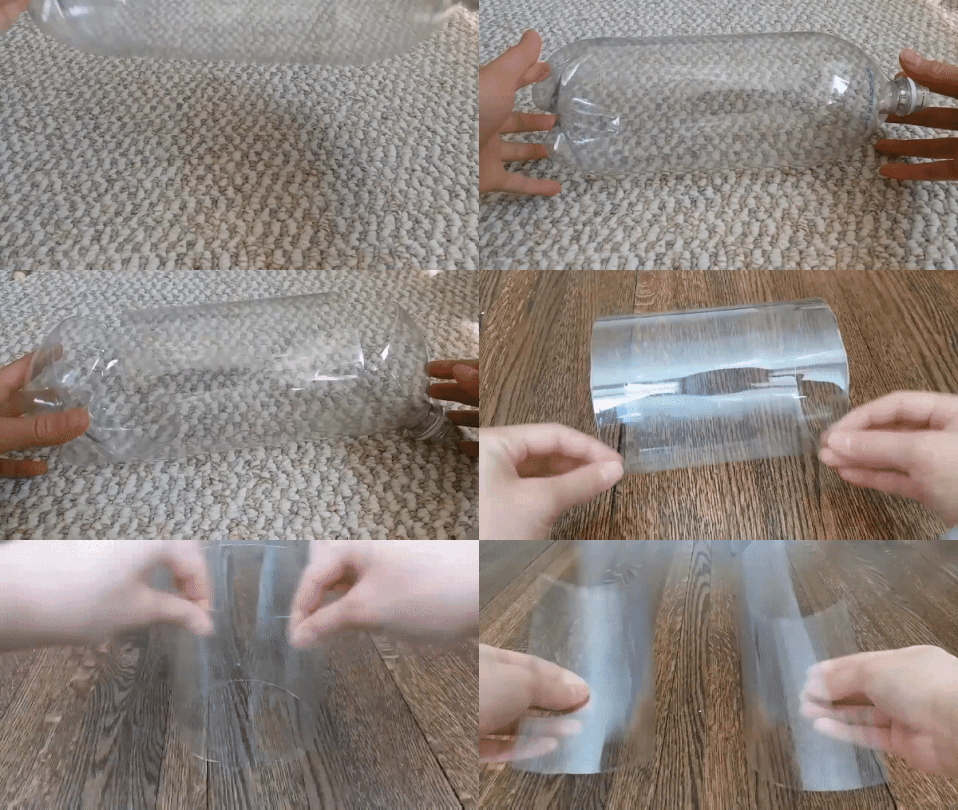
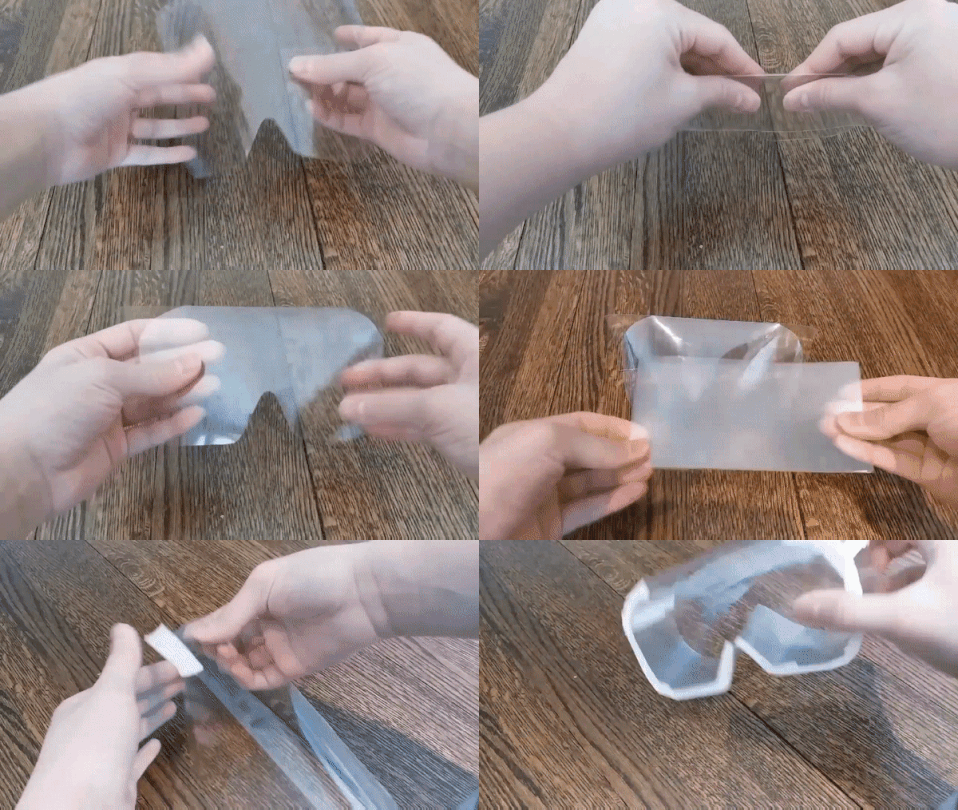
- Cut out Plastic Bottle: First, take the plastic bottle, cut its middle round part, and leave the head & bottom areas. Then cut this rounded part into two equal halves.
- Mold it: Now, as you can see, the plastic parts are bent, but we need them straight; in order to do that, bend the parts in opposite directions and put them into some small round roles for some hours.
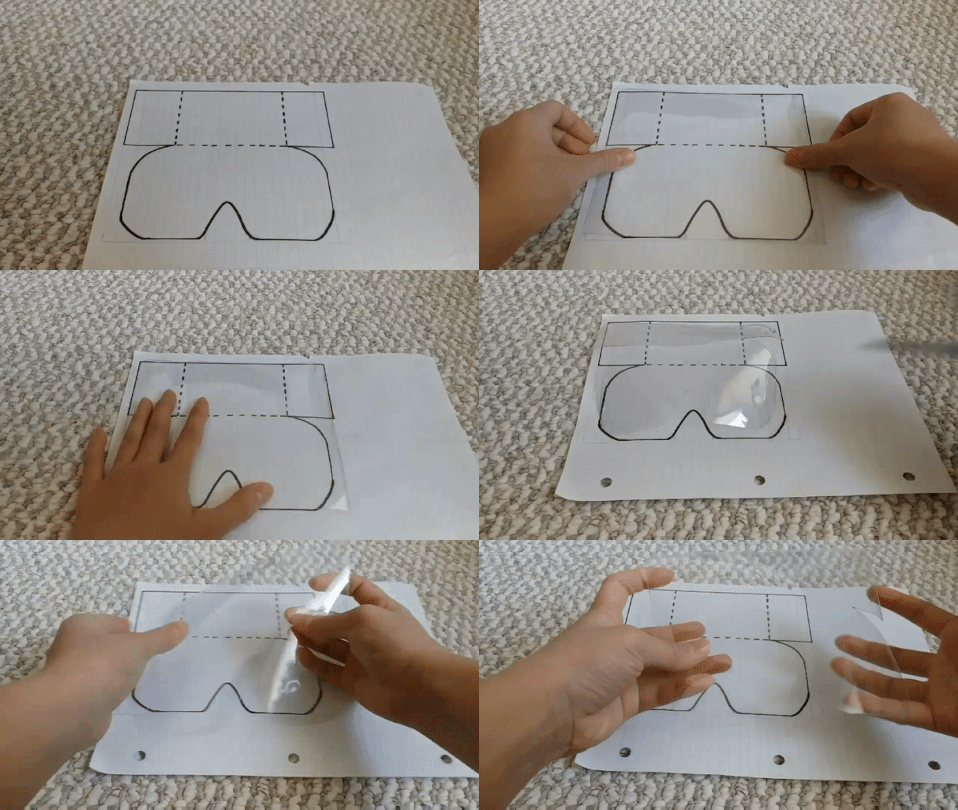
- Draw a Goggles Sketch: Using a pencil, draw a goggles front lens sketch on the paper. It is recommended to sketch these goggles by measuring your face. You can also use a Snow Goggles drawing template from the internet & print it out. On top of the lens, draw a rectangle about 3 ~ 4 inches in height ( which will be the frame between your face & lens ).

- Make the frame parts: Get the parts out of the mold; they should be straightened. Now, put one plastic sheet on the drawing and cut it out. Then, bend the other sheet in half, which we will use later as the bottom of the frame.
Step no 3) Assemble the Parts
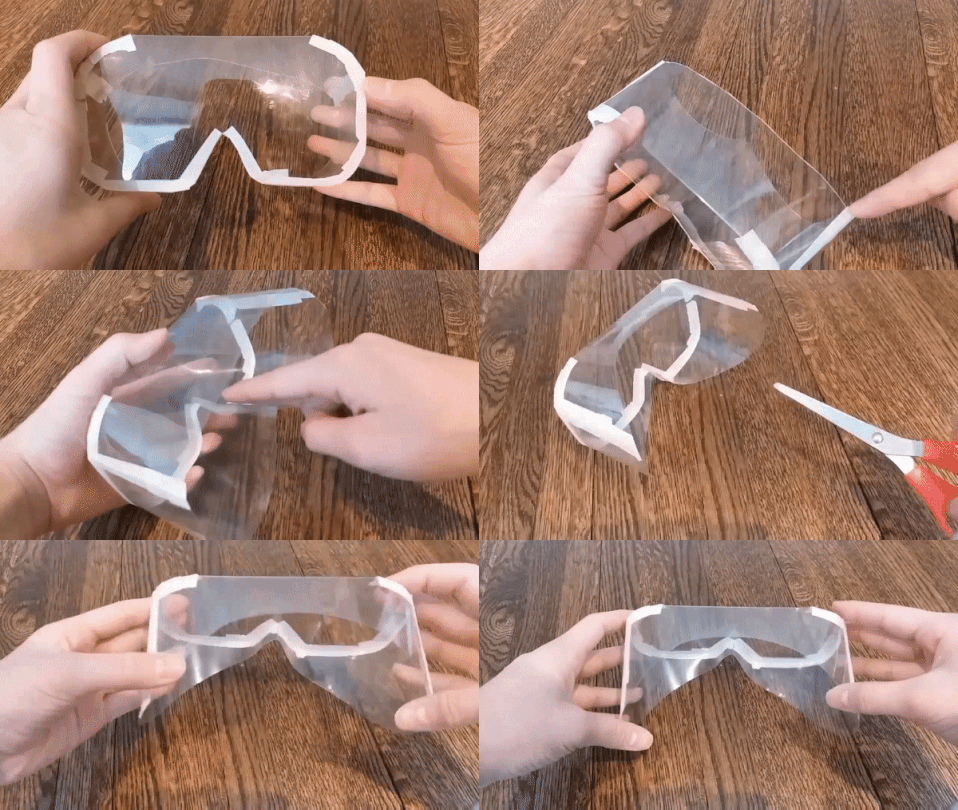
- Assemble the Frame Parts: Now, take the plastic lens sheet, bend it, and tape it. Then, place the second plastic sheet bent area at the nose part and curve it on both sides until they reach the top rectangular area of the season’s sheet. Tape all the areas securely, making sure no gap is left for air, dirt, snow, or anything else to come in.
- Cut into Shape: At the face side of the face ( back of Goggles ), cut a curve at the top part so it can stay on your curved head, and cut a triangular part at the bottom for fitting on your triangular shape face ( nose to the ears angle ).
- Add Foaming Sheets: Now, at all the edges & sides, attach a foaming sheet that will act as a cushion between your face and goggles to avoid injury. Plus, the foaming sheet makes the goggles look cool.
- Attach a Strap: Make two holes at the sides of the Goggles and pass through an elastic strap or cord.
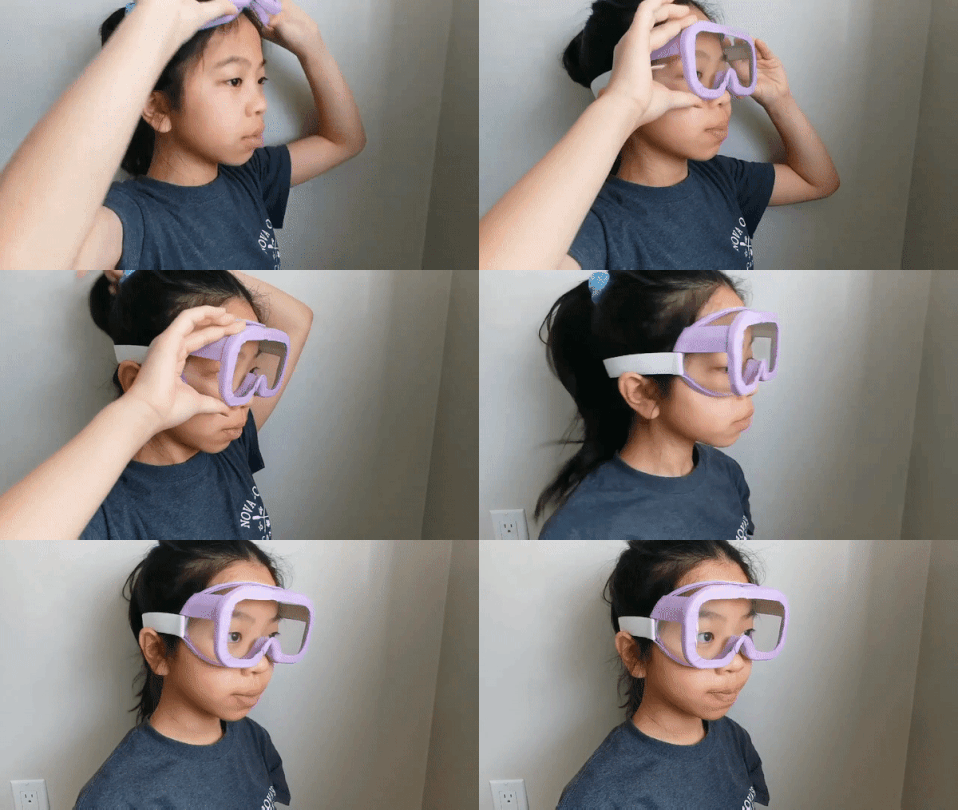
That’s it. Your Goggles are completely done. If you want to use your goggles as safety goggles, then they are perfect as they are, but if you want to use them in snow, it is recommended to make 3 small holes at the top and 3 at the bottom ( no more than ⅛ inches wide ); this will cause good air ventilation and decrease fogging.
3) How to make Homemade Advanced Motor Bike Goggles?
And the last goggles to make on our list are Motorbike Goggles which you can use during normal daily drives and maybe in MX races, but without tear-off/ roll-off features, they will not work for long under heavy dirt conditions.
3-Easy Step Guide
- Step no 1) Collect Materials
- Step no 2) Cut out the Parts
- Step no 3) Sew & Assemble Parts
Step no 1) Collect Materials
All you need to buy from the market is cheap glasses, and the rest of the materials will probably be at your home. Here is the list of materials you are gonna need;
- Cheap Glasses
- Burner
- Blade / Knife
- Glasses Cover
- Thread & Needle
- Faux Leather Sheet
- Elastic Strap
- Scissors
- Pencil
- Glue
Step no 2) Cut out the Parts
- Cut the Glasses: Take out the lenses from the glasses and put them aside safely because we are gonna need them later. Then cut out both eye parts from the frame and throw out the legs & middle areas of the frame. Use a blade or knife for cutting; heat them on a burner or stove for fast, easy, and precise cutting.
- Make Holes in Eye Parts: Using a Burner and a needle, make multiple holes around each eye part. These holes will later be used to sew eye parts & the cloth frame together.
- Sketch & Make the Leather Frame: Now, pull out the glasses cover you bought from the market and cut it into two equal pieces. Place one piece of cover on a smooth surface and place the eye part on it. Then, draw a shape around it so that it will cover your eyes to the head, and also draw an area on the nose, which will be a bridge or attachment point between two eye frames. Later place the other eye part on the second glass cover & do the same. Finally, cut out your sketches.
Step no 3) Sew & Assemble Parts
- Sew Frame: Now, use the cut-out drawings and sew them together so they can make a frame shape.
- Cut the Backing: Now place the goggles frame on the faux leather sheet, draw out the frame shape, and cut it out.
- Attach Eye Parts: Next, using glue, attach the eye parts to the cloth frame you saw earlier. Then using a needle, sew the cloth frame & plastic eye parts from the backside. And finally, use glue again at the side & all edges of the eye parts to make them airtight.
- Attach Backing: The faux leather sheet which we cut earlier, place on the back of the Goggles and sew it at the inner & outer sides.
Attach Strap & Lenses: Make two holes at the sides and attach the cord or adjustable strap. And finally, put in the lenses which we separated earlier. That’s it. Your Vintage style Motorbike goggles are made and you can use them anywhere.

